15

So you've got a nice, flat-topped cake after learning on Seasoned Advice how to eliminate doming and now you wish to ice it as perfectly smooth as you see it sometimes done commercially: no ridges with a even sheen.

Any secrets beyond patience and an artistic flair?

I already use a long, flat icing spatula.

8 Answers 8

15

Professionals ice on a turntable. Turntables for home use are affordable, and make icing much easier.

Your spatula should reach to about the centre of the cake when held steady and comfortable. As @rfusca suggests, heating it for buttercream is a good idea. You can also wet it for other icings, to make it glide smoothly.

For the icing process itself, start with the top of the cake. Apply a generous amount of icing; you will be thinning it out with the spatula, not smearing it right and left to get an even thickness. Hold the spatula to an angle to the cake, tip at the centre, and rotate the turntable. Let excess icing drop to the side of the cake. When you have done the top, smear icing thick on the side, hold the spatula vertically, the edge at 45° to the cake side surface, and again turn the turntable. When you have finished, you will have raised icing on the edge of the cake. To finish the cake, smooth these edges.

To do this, you need enough icing. "The professional chef" recommends 340 g (12 oz) for a 20 cm (8 in) cake and 454 g (1 lb) for a 25 cm (10 in) cake.

This all assumes buttercream icing or other spreadable icings such as ones based on whipped cream or creme fraiche. It is somewhat tougher for semi-liquid glazes such as ganache.

2
  • semi-liquid glazes can be an advantage, as they're like self-leveling compound; you pour it on, and tilt the cake so it's coated and drips down the sides. Or see How to get glacé icing right on a cake?
    – Joe
    Commented Oct 11, 2012 at 12:36
  • Depends on how liquid the "semi-liquid" is, and also if you have enough to pour over the whole cake and let it drip on the sides. If you get aluvial patterns from dripping it sparingly, or from using a thick ganache, and tilting isn't enough to make it smooth, you have to start levelling it with the spatula, which doesn't look as good.
    – rumtscho
    Commented Oct 11, 2012 at 16:38
8

There actually are a few tricks that haven't been mentioned, other than years of practice:

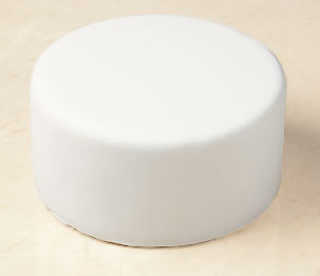
First, you need to start off with a crumb-free cake. That is, you don't want any loose crumbs from poking through the icing, ruining the coat. After stacking, I first brush it off with a pastry brush, then I apply a 'crumb coat', a thin layer of icing that's let to set up, locking in any remaining loose crumbs.

If you're not going to do a crumb coat, you want to put all of the icing on top of the cake that you're going to use, and slowly work it down. You tend to use more icing in this procedure, so that you're not scraping too close to the cake, and use a looser icing on the final coat.

For the final coat, you really need to use a turntable -- when doing the sides, you hold the spatula still, while turning the cake. It's also useful for the top, so that the height's the same on all sides.

Now, for the trick -- there's a time when some icings will develop just a bit of a crust on top. (I don't know if this happens for ones made with butter; I use shortening to get stark white) It won't be sticky, but the icing below's not fully firm. When you're in this limited window, you can place a sheet of waxed paper on the cake, and rub lightly to smooth out spatula marks or any other imperfections.

Your typical problem spots are right at the bottom edge where it meets the platter, and the top corner ... so you cover those up with a rope or other border. (another place where the turntable helps)

6

If you're talking about buttercream or such icing - warm your spatula just a bit so that the icing melts just slightly as icing spatula hits it. I keep a bowl of hot water for this purpose beside the cake while icing.

1
  • 1
    This + practice... lots of practice. Commented Mar 15, 2012 at 8:00
3

i've actually heard that you can use a hair dryer set low to do this, too.

3

I don't wish to detract from the answers offered already, but for a smooth professional finish what I think you may be looking for a product called Fondant

cake layer covered with fondant

Fondant is an extremely versatile product that can be used in a variety of ways.

It can be rolled out and draped over a cake to give it a smooth clean finished look. The cake to the right has a full layer of white fondant as the base, and is accented with the stripes of red fondant to give it an old fashioned candy look.

Fondant can also be poured over a cake as a liquid to give it a pristine, clean, and professional finish.

One source of fondant can be found at "The Wilton Web Site". (link provide is an example of fondant, not an endorsement of the product) However, if you have a local cake decoration shop you can probably get it there.

4
  • 1
    I would make my fondant at home if I needed any. However, it tastes very different from icing, so it changes the cake a lot.
    – rumtscho
    Commented Mar 15, 2012 at 22:12
  • When OP asked for a 'smooth' finish fondant is what comes to mind. Personally I prefer icing on a cake.
    – Cos Callis
    Commented Mar 16, 2012 at 6:50
  • I'm going to assume that you've never actually used fondant -- as you'd know that it is not a saving grace, and that you have to do a lot of work to get the cake underneath smooth, with an even layer of icing, or the cake will have a strange lumpy look to it.
    – Joe
    Commented Oct 11, 2012 at 12:27
  • 1
    @Joe, I don't think I said it was a "Saving Grace", I know from experience that it is "easier" to get (what OP asked for) a 'professional smooth' appearance with fondant than with traditional icing.
    – Cos Callis
    Commented Oct 12, 2012 at 2:07
2

Top tier professional bakers do a few things, some mentioned here but some not. Here is the run down:

  1. Most top tier bakers are using Italian buttercream. It's more stable than American buttercream and IMHO tastes way better. Otherwise use American buttercream. Make sure the buttercream is just soft enough to spread but if it's too goopy or spongy you'll end up with endless air bubbles

  2. Always apply a thin crumb coat to your cake. Then the fridge or freeze until the crumb coat is firm. If it's not firm, there is no use in applying it. So be patient. Takes 20 min in a typical freezer, 1 hour-ish in the fridge.

  3. While on the turntable, use an offset spatula to apply first on the top and then on the sides, per the instruction of others. The key here is to press firmly (but don't smash) the buttercream during this application. Otherwise you're back to the air bubble problem.

  4. Using your spatula to smooth the side can be crazy hard. Use rectangular shaped metal smoother. Wilton makes one. The right angle and bottom help you keep the scraper parallel to the side of the cake.

When trying to smooth do one full rotation of the table using your opposite hand by placing your free hand just behind the smoother and turning the table by pulling it around towards you, away from the smoother (if you're holding the smoother in your right hand this would be a counter clockwise rotation.

  1. Again per others, smooth the top by starting at the edge and then pushing the frosting away from you towards the center. But never pull it towards you. Also don't push down. Just start right in front of the edge and in one motion sweep it towards the other side stopping BEFORE you hit the far edge.

  2. Some people use hot water to heat up the spatula or smoother as they work. It's not really necessary if your buttercream is the right temp, but it can be helpful in the beginning. Just be sure to dip the spatula in the hot water and then wipe it dry before proceeding.

  3. Sometime as you work, the buttercream will start to warm. If you notice it getting goopy just stop what you're doing and put in the fridge to cool for a few minutes.

1

if you take the wilton cake decorating classes they tell you that after you ice it put it in the fridge for 5 minutes and then pull it out and take parchment paper to smooth it.But you have to get the icing as smooth as possible then put it in the fridge uncovered. Then you take the parchment paper and set it on top of the cake and gently press down to smooth it. It is very similar to the paper towel version but if you use a paper towel there is risk of paper towel pieces getting stuck in it.

1
  • You need the 'shop towel' type of paper towels, which are much more durable. The result is a matte finish. If you use parchment or waved paper, you'll end up with a glossier finish. And thanks, when I took a Wilton class ~12 years ago, they didn't mention putting it in the fridge for a few minutes.
    – Joe
    Commented Apr 4, 2015 at 13:53
-3

Use a paper towel to smooth out icing. Trust me, google it!!!

2
  • 1
    For this to be a useful answer, you should explain in detail the technique. Asking the OP to google it isn't helpful.
    – lemontwist
    Commented Dec 26, 2012 at 11:56
  • 2
    I'm going to assume it's the same trick that I mentioned (although I used waxed paper). You can use paper towels, but not all of them will work. I was told to use the 'shop towels' sold for automotive work, not the kitchen paper towels, but that was almost a decade ago and it's possible that it's changed. And it ends up generally flat-ish, but with a slight texture. It might be better for afixing decorations on the sides of the cake, and it helps to make imperfections less noticable ... but for smoothest, use waxed paper.
    – Joe
    Commented Dec 26, 2012 at 16:38

Your Answer

By clicking “Post Your Answer”, you agree to our terms of service and acknowledge you have read our privacy policy.

Not the answer you're looking for? Browse other questions tagged or ask your own question.